Introduction to cartooning
Tutorials for the next four weeks will be focusing on cartooning techniques and then providing opportunity for you to practice creating individual visual responses to creative briefs in whatever drawing style you find appropriate for the purpose of communicating your ideas.
All of the rest of the tutorial exercises for this unit are now specified on these course web pages without reference to a specified text as was the case with the preceding exercises.
Option to draw with a stylus and tablet
As you commence drawing from the imagination - versus drawing what you actually see - some of you may be interested to explore the use of a stylus and tablet. Indeed, you may already be quite proficient with these digital drawing tools. Please appreciate that not all tutors of this unit are proficient with them and the techniques are not formally taught in these Illustration and Visualisation tutorial classes. However, in most of our campus digital media labs Wacom drawing tablets are available to be borrowed. If you are interested ask your tutor about this. If practical, drawing tablets may be used for the remaining tutorial lessons of this unit.
CQU is registered as a Wacom Authorised Training Centre. One of the benefits of registration is that CQUni staff and students can now purchase Wacom products at heavily discounted prices. For further information about this opportunity email Jim Picton (j.picton@cqu.edu.au).
Today there are 11 exercises to complete. Each exercise is to be completed quite quickly. The exercises under 8.1 introduce you to drawing cartoon faces and lead you to experiment with expression and characterisation. The exercises under 8.2 introduce you to the cartoon portrayal of simple gestures and body types.
Exercise 8.1: Experiment with the power of the doodle to express character and emotion
Objectives:
- Develop fluency and loosen up by producing multiples of primitive shapes quickly and repetitively.
- Experiment with basic facial types and expressions using two-dimensional primitives quickly and repetitively as in the first point above.
- Work toward being able to control your cartoons through demonstrating ability to produce a consistently identifiable character in different views.
What you’ll need:
- Dozens of sheets of scrap (recycled or butcher’s quality) paper
- Soft grade pencil
- A felt-tip pen (exercise 8.1.7)
Note:
Exercises 8.1.1 to 8.1.6 are to be completed using a pencil or stylus & tablet only. No erasure is allowable in these exercises. Just redraw and redraw… Only exercise 8.1.7 may be completed using a pen.
Exercise 8.1.1
Remembering the loosening up aim of the exercise, try to keep your wrist off the paper and use your whole arm and wrist to produce sweeping movements. Thinking of a crowd of thousands of faces in a football or rock concert stadium, fill each sheet with loosely drawn oval shapes. Keep going until you have produced hundreds of them – just ovals with no other detail. This may take up to 15 minutes.

Exercise 8.1.2
Fill a sheet of paper or two with oval shapes and add a ‘T’ shape into each oval to form basic nose and brow shapes. Keep varying the placements and angles of the ‘T’s in relation to the oval outlines. Approx 10 minutes.

Exercise 8.1.3
Using the ovals with ‘T’ shapes add two dots for eyes to each of them. Notice how expressive of types, moods and emotions these simple primitive doodles can become. Next produce another sheet or two of these basic heads consisting of oval, ‘T’ shape and two dots, working quickly to complete one head shape and its content at a time. Approx 10 minutes.

Exercise 8.1.4
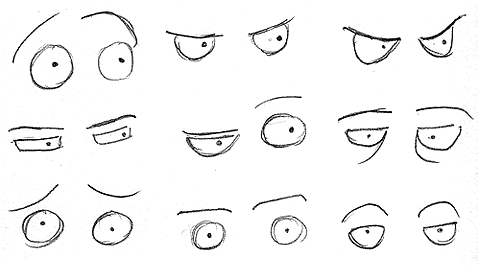
In terms of primitives, eyes consist of three main elements: a pair of ellipses, with dots for the pupils, and these are usually topped with a pair of lines for eyebrows. Yet using these elements an amazing variety of expressions can be indicated. In cartooning the eyes are the most expressive element of a face. Spend 10 minutes experimenting with variations of pairs of simple eye shape. For now, do not include the rest of the head. Work rapidly and sketchily to fill at least two pages.
Exercise 8.1.5
Draw a cartoon head (face-on view) complete in 30 seconds maximum following four simple steps:
- Sketch the outline shape and sketch lightly a crossbar as a guide for the position of the nose and eyes.
- Add simple eyes, eyebrows and a nose. The nose shape and scale relative to other elements will contribute significantly to the impression of gender, character and age.
- Outline the hair shape and add ears (if visible) and a mouth. The mouth shape should work with the eyes to compliment the expression.
- Add hair and detail. Add emphasis to your line work where necessary. However do not labour the line work. Keep it spontaneous. Keep any detail simple too. Less is best.

Exercise 8.1.6
Produce very quickly dozens of variations of heads. Try using different outline shape primitives such as triangles and diamonds to produce many different examples that vary in gender, age and character type. Experiment also with different expressions as you go. For now, stay with face-on views. We will practice profiles and three-quarter views in the next exercise. Approx 15 Minutes.

Exercise 8.1.7
Choose five of the characters you produced in exercise 1.6. For each character quickly redraw the face-on view then add a three-quarter angle view and a profile (side-on) view. You may find it useful to start with a volumetric (3D) version of the primitive shape that you began with, however, this is not essential. However, if you do this you will need to remember to wrap your guidelines around the shape.
The objective is to continue the characterisation established through the three views of the same character. Try also to maintain the expression so that is consistent in the three views so that the effect is of three views of the same moment in time. You may finish these drawings using a felt pen if you wish. Approx 10 minutes.

Exercise 8.2: Experiment with body language
Objectives:
- Use stick figures to convey actions and attitudes.
- Maintain spontaneity of sketches through quick repetitive experimentation.
- Flesh out stick figures, maintaining the recognisability of the action and the expression of the body language.
- Experiment with body shapes as an expression of character.
- Experiment with the addition of clothes to further establish characterisation by playing on stereotypes.
What you’ll need:
- Dozens of sheets of scrap (recycled or butcher’s quality) paper
- Soft grade pencil
Exercise 8.2.1
Use stick figures to express the body language that you associate with the following terms. Try to use fairly realistic proportions for the body but exaggerate the pose in ways that enhance the expression. Use an oval only with no features for the head so that only the pose itself is expressive.
● Champion!
● Run for your life!
● Yippee!
● This will be a sinch! (very easy)
● Tired and dejected.
● What the?!#*!
When you have completed these produce another six of your own. Number them 1-6 and record separately a caption indicating what action/mood you were intending to express with each. Show your stick figures to someone else and see how many of the expressions they can guess correctly. Approx 5 minutes.

Exercise 8.2.2
‘Flesh out’ your stick figures from 8.2.1 using ‘balloon’ shapes or other two-dimensional shape primitives. Try sketching in some facial features that will complement the concept expressed by the body language. Approx 5 minutes.

Exercise 8.2.3
Body shapes. Experiment with as many different body shapes as you can in five minutes. Concentrate just on the body and appropriate body language to go with it. Leave the face blank and the clothes out of the picture for now. Some suggestions are:
● Pear-shaped man
● Pear-shaped woman
● Male superhero
● Female superhero
● Athletic type
● Tall and skinny (lean)

Exercise
8.2.4
The clothes maketh the person. In most situations in real life it is ‘politically incorrect’ to stereotype people but in cartooning one has special licence to identify clichés and types. When it comes to characterisation, many of the roles that people play in life have formal or informal ‘uniforms’ associated with them that the cartoonist can employ. Use your common knowledge and your imagination to experiment with masculine and feminine versions of the following professions and lifestyles. Don’t forget about accessories like hats, spectacles, briefcases, implements of trade, sunnies, jewellery etc where appropriate. In some cases you may be able to match these up with body types that you have already experimented with. Once again work quickly and sketchily. Use minimal details for the faces as in 9.1.3. Approx 10 minutes.
● Professor ● Lawyer ● Judge
● Executive ● Retiree ● Surfie
● Farmer ● Hippie ● Doctor
● Nurse ● Police ● Schoolboy/girl

That is the end of the drawing tutorial for this week. But you should take every opportunity you can to practice.