What is visualisation?
Review and introduction
Last week when we talked about the expressive lines that are the fundamental basis of drawing. Drawing has many sensorial qualities to which we respond visually, but which do not necessarily give rise to coded meaning as is the case with written textual language. This is not to say that we never use codes and symbols in drawing. Rather, the point here is that when we freely make use of lines, tones, textures and spaces in drawing, we are making connections that overlap in the sensory fields of our perception and which may not rely purely on visual associations. For example, the sensation of texture arises primarily from our sense of touch, but our experience of texture also comes to us from our sense of hearing and from our sense of sight. Think of something silky. You can probably imagine in your mind’s eye how it would have a sort of sheen to it. You can also probably imagine the way that silk falls and flows when draped over a form. You may also be able to imagine the sound your fingers might make if you brushed them over a silky surface. The sheen, the movement and the sound, together with the soft and smooth and cool sensation when we touch it are all part of our experience of silk. A successful drawing may express these multiple qualities simply through the use of line, texture and tone. In other words, the qualities that may be achieved in drawing enable us to invoke sensory, emotional and intellectual responses that are actually a synthesis or accumulation of multiple sensory and cognitive experiences.
Similarly, the way that one organises shapes on a drawing surface when one is composing, and the choices one makes about what to leave blank and where to render tonality and texture - and how, will call on the viewer’s ability to interpret and make sense. As the creator of the image you can exert some control over this communication.
In this lecture we will first look at ways of distinguishing the main subject—otherwise known as ‘the figure’—from the background—otherwise simply known as ‘the ground’. We will also be considering ways to organise the shapes that comprise a composition in terms of their relative negative and positive values. This first part of the lecture will compliment the exercises that you will be completing this week and next week in the MMST 11010 drawing tutorials.
In the second part of the lecture we will take the opportunity to consider how the elements of drawing that we are discussing in the lectures and practicing in the tutorials are implemented when applied in professional communication as visualisation and illustration. In particular we will consider that there is often a difference in approach to composition when one is working on an applied drawing from the more general cases of drawing practice. Then finally, the procedure commonly used to visualize small and large projects alike throughout the creative industries will be outlined.
Composition and the concept
Composition defined
Betty Edwards defines composition:
An ordered relationship among the parts or elements of a work of art. In drawing, the arrangement of forms and spaces within the format.
(Edwards 2012, p266)
Figure and ground
For Edwards the primary consideration in composing a drawing is how to organise the positive shapes, or the 'figure', and the negative shapes, the 'ground', within the format or shape of the drawing surface (see Edwards 2012, p116). Usually the figure is a positive shape of a form that serves as a the main feature in a composition and the ground (negative space) is the space surrounding it. However this relationship may be reversed or made ambiguous for effect.
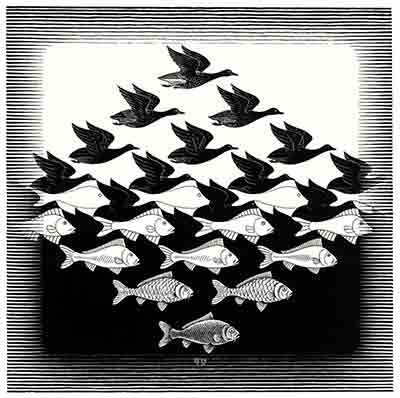
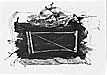
Sky and Water. This woodcut by M C Escher plays with figure/ground relationships.
In drawing one may decide to isolate the main item of focus, commonly referred to as the subject, from its background. This is often a matter of finding the outside edges and determining how one will treat the positive and negative shapes in order to best define the form of the subject (see Edwards 2012, pp: 112-118). The positional placement of the subject and its size in relation to the drawing space—the paper or a framed area within it—is not only a major component of composition but it also helps to establish what we call the figure-ground relationship.
When one is depicting a number of items or including background elements in one’s composition, then this figure-ground aspect becomes more complex and one needs to work harder at defining the relationships. The compositional decisions one makes concerning the relative positioning of elements in a picture and whether or not overlapping will occur and if so, how, help to define these relationships.
Devices like the various forms of perspective (to be discussed in Lectures, Weeks 4 and 5) may help to define spatial relationships and depth. But in illustration and in diagrams one is not always concerned with depth portrayal and so alternative techniques for separating figure from ground and figures from each other may be even more relevant. Some of these techniques are:
- varying line weight and or quality (refer Lecture Week 2 )
- using highlight and shadow (refer Lecture Week 7)
- making use of gradients, patterns and textures (refer Lecture Week 7)
- applying different tonal values and using tonal contrast (refer Lecture Week 7)
- discriminate use of colour temperature, colour contrasts and other colour and hue relationships (refer Lecture Week 7)
In the context of teaching basic technique with which to approach observational drawing Betty Edwards' definition of composition makes unqualified sense. However, in the context of applied drawing for the purpose of visualisation or illustration there is something missing from this definition. I wonder if you can guess what it is?
Purpose
When one is producing any artwork or design for professional communication the fundamental consideration before all else is the communication objective or purpose. This is usually evident to the artist or designer in the form of a 'brief'. The written or verbal instruction that has raised the need for the particular asset that one is about to embark on the process of creating is called a brief.
The not-so-blank page
Whereas the artist may be confronted by a truly blank sheet of paper, the commercial artist’s blank page is never actually blank. It is always, at least metaphorically, underscored with an ulterior motive to exist. And it is against this motive that its continuing existence, from the moment it first sketchily emerges to the day it is nestled purposefully into whatever format or media it is applied to (assuming that it has survived long enough to do so), that a visual concept will—at least in its commercial context—be appraised and judged. There are always many casualties along the way and, indeed, the very purpose of the visualisation of a concept is to enable judgments to be made about the appropriateness of the idea itself, and its proposed form, in terms of suitability for the task. One of the first lessons to be learned in this field is to avoid being precious about your drawings as objects in themselves. Their final resting place is just as likely to be the recycling area as the public arena.
The creative brief
Communication objectives and briefs vary from the vaguest of notions to complex, detailed and very specific instructions. When vague, your job may entail interpretation and conception of ideas from scratch. When specific, it may be that the visualisation task is simply to draught visuals according to instruction.
There is no rigid formula for a creative brief. However in most cases major considerations such as the following will be expressed:
- Purpose
- Background
- Target Audience
- Task
- Budget & timeline
- Expectations
More detail about what may be expected from a creative brief is contained in a document published by the Australian Government, Department of Prime Minister and Cabinet, Government Communications Unit. called How to Write a Brief for a Graphic Design Consultant. The copy of this document accessed via the above link was downloaded on 18/03/06 from: http://www.gcu.gov.au/code/pdf/how_to/graphic_design.doc (a direct link to the site is also provided in the 'related links' panel at left). These guidelines are written for Government officers who may be responsible for issuing a brief to communication consultants and so give a general idea of what one may expect of a brief from such a source. The considerations apply broadly in the field of visual communication and not just to the field of graphic design..
Responses to the brief
Generally speaking, the overall creative process for coming up with visual solutions to communication requirements involves the following steps, up to five in total prior to the production stage:
1/ Brainstorm
These are informal sessions which may involve a small team where various techniques are used for idea generation. The objective is to generate as many ideas as quickly as possible in a way that fosters lateral thinking. Conceptual considerations, visual sketches, mind maps and word play are all thrown into the melting pot. These are usually recorded and critically reviewed in a repeated process with the overall aim being to first, open out and then, to whittle down the possibilities to only those strong concepts that creatively satisfy the brief.
2/ Raw Concept
The end result of the brainstorm is one or more raw concepts. The concept may, at its earliest stages be a short verbal description or it may be a written synopsis. It may be supplemented with roughly sketched visual ideas. However, because any sketches would have been produced extremely quickly, these are not likely to be of the quality that would convince anyone, who was not party to the brainstorm session itself, of the merit of a concept. So, the next stage is to rework key aspects of the ideas, massaging them into a more developed visual format.
3/ Thumbnails
This step and the following two are the most broadly relevant in the context of this unit and also in the context the current topic, composition. For it is during these phases that all of the visual elements that need to be included are to be allowed for and allocated space within a format.
The elements that are required to be included in the thumbnails will vary from project to project and according to the proposed media format that the idea is being developed for. The requirements for an editorial spread are different from those for an advertising billboard. The requirements for those static media forms are quite different from those for time-based media, such as movies or TV adverts, which will need a number of key frames to be depicted and quite likely some form of additional notation referring to a script, to audio, and to action details. Web sites and interactive media have different requirements again. Key screens will need to be visualized with annotations about related media channels (audio/visual, voice, data, interactivity, etc) and these may also incorporate or be accompanied by an indication of informational and or navigational structure.
Regardless of the end application that is being designed for, the approach to the production of thumbnails is the same. It is likely to be an iterative process, in other words, a process that is repeated several times with each version being an advance on or an alternative to the previous. Thumbnails may start as loose and spontaneous doodles and be gradually developed with more and more compositional structure. They are as the name suggests, generally quite small in size, though not usually as tiny as one’s thumbnail (sizes up to about 6 cm x 10 cm are fairly common but they can be larger). Thumbnails are meant to be quickly generated and are considered to be very much a part of the development of the concept itself. It is acknowledged that things are in the process of being worked out. Even so, once thumbnails are resolved to the degree that they are considered to demonstrate the basic structural elements of the visual aspects of the concept they are usually reviewed and appraised. This will often be an internal team evaluation, but may sometimes also involve the client or an art director.
4/ Concept roughs
Unless it is decided when reviewing the thumbnails that the concept as conveyed by them does not support the communication objective they will not usually be reworked as thumbnails. Rather, any modifications or adjustments that are evident to the appraising team and/or requested by the client and/or suggested by the art director will be noted and incorporated into the further development that will be undertaken during this stage.
Concept roughs are larger and more detailed than thumbnails. If typography is required it may also be introduced at this point, usually a suggestion of the font style is sketched it by hand. The emphasis and relationships between elements is fine-tuned. Because concept roughs are still largely concerned with the establishment of appropriate points-of-view, with composition and, with establishing what details may be required to support the concept, then they may be produced as drawings in line without tonality. The style of line will be less sketchy than in thumbnails—more definite, bold and confident. Depending on the project, sometimes colour is introduced at this stage too. If so, it may be rendered with coloured markers. The concept roughs are not meant to be overly laboured. They are produced quite quickly and efficiently. Sometimes conceptual options will be presented to enable decisions to be made.
Depending on the proposed medium of creative production, on the mode of publication and on the project budget, the concept rough may be as far as the concept team or concept artist takes the project. Particularly if the final art is to be photographic or a movie or video, it may be handed over to a new production team with specialist skills.
Alternatively the finished art may be produced from this stage on using stock imagery. Or, using the rough as a guide, it may be synthesised by a computer operator who specialises in using software tools for digital graphic production and, in the case of printed items, pre-press combining and colour separation.
In the case of a time-based or interactive project, where multiple concept roughs are produced depicting key frames or screens these are collectively called the storyboard. Storyboards are always supplemented with textual instructions and notes.
5/ Comprehensive visual
If the project has a higher budget and, quite likely if the product is to be illustrative finished art or a cartoon, then another level of visualization will be requested before the final production is given the green light. If a specialist illustrator or cartoonist is involved they may be given license to embellish the concept the concept further at this stage, to add their personal vision, characterization, sense of humour or whatever. Certainly that person will be expected to be adding more of their own stylistic touches in a comprehensive visual, to be resolving issues to do with colour, texture, look and feel, and overall finish. In the case of an illustration the comprehensive visual, sometimes also known simply as ‘the comp’, is the equivalent of a prototype for a multimedia project. It really is the final proof of concept. It is often required to convince clients to commit another level of expenditure. Sometimes it may also be necessary to satisfy an art director that the illustrator is truly ‘on the right wavelength’ before a totally embellished version is commissioned.
The importance of visuals
In an advertising agency and in a computer games or animation production house, there may be a number of creative teams working on different sections of a larger project, and there may be a number of creative projects going on all at once. There may be teams or individuals that specialise in particular creative techniques and in certain stages of concept development and visualisation. The practice of producing progressive visuals helps to maintain communication about the creative development between all parties involved, and it provides a trail of documentation which can be used for quality control and as a record for billing purposes.
The drawings and notes produced at all of the levels of visualisation should be retained for reference during production. Sometimes a consideration that has dropped out during the process of development re-emerges as an issue of importance during production, and so looking back at visuals produced at an earlier stage can clarify the communicative intention.
In smaller organizations, in the case of owner-operated businesses and where the creative free-lancer is a single designer, artist or illustrator, one person may see the whole process through from start to finish. Even in these cases the rigorous discipline of the production of progressive visuals is most usually adhered to.
Milestone
The acceptance of whatever highest level of visual that has been methodologically and/or contractually prescribed in the planning of a project is an important milestone. Often progress payments are hinged around this event. It usually involves someone with the appropriate authority signing off on an agreement to proceed with production. The visuals may comprise part of the ongoing specification and the contractual arrangements for production.
Whilst this milestone is of both practical and symbolic significance it does not mean the end of the creative input. In the case of the production of an illustration for instance, it would be a mistake for the illustrator to switch off and simply take a ‘colour-by-numbers’ approach to the execution of the final piece. On larger multimedia projects, computer games, and animations, there are often many further steps and levels of prototyping, modeling, technical experimentation and more concepting and visualisation steps involved during production.
Visualisation and assignment 2
One can see that each of the levels of visualisation described above may call on a progressively higher skill level with regard to drawing and rendering. It is not expected that everyone participating in this unit will achieve proficiency sufficient to confidently undertake the production of comprehensive visuals. However, because the minimum level of requirement for participation in most creative development teams is to be able to contribute meaningfully by sketching thumbnails for the purpose of organising concepts and communicating visual ideas, it is anticipated that your participation in the drawing tutorial exercises will free up the connections between your mind’s eye and your drawing hand to enable you to achieve this. Remember that at the thumbnail stage, provided that one is genuinely tackling the conceptual issues which the communication challenge involves, then there are no wrong responses, wrong ideas or wrong visual solutions.
With your final assignment for this unit you will be expected to work at a level one step above that of the thumbnail. You will be asked to develop a storyboard visual to the level of the concept rough. You will be expected to demonstrate that:
• you can think through the issues involved in establishing appropriate point(s)-of-view;
• you can control your composition so that the important conceptual aspects of your solution to the brief are highlighted;
• you have practiced drawing enough to be able to use a style of line work which is appropriate for demonstrating your ideas at the concept rough level.
Conclusion and note about this week's readings
This focus of this lecture began with a definition of composition from an artist's perspective. That definition was modified to fit the circumstance of applied art. In arguing that purpose forms the basis for a significant distinction between the art and applied art, the assumption is not that art in general is necessarily without purpose, motive or intent. However it is hard to disagree with the premise that applied art must always serve a communicative purpose and, that the purpose must influence the work produced in the most fundamental ways. So, the creative challenge is to appropriately apply one's own interpretation to concept development and one's understanding of technique to the task of visualisation.
The Hart and the Sibley readings available via the CQU Library CRO demonstrate real-life examples of the use of visuals in multimedia production.
Also take time to look through the visualisation portfolio examples at the Chulo Creative site and the Intro to Storyboarding video in the links of interest.
References
Edwards, B., (2012) Drawing on the Right Hand Side of the Brain, Souvenir Press